The FunTechHouse project, a open source home automation system - Room temperature sensor
Abstract
Measure the temperature with one or more LM35DZ or DS18B20 temperature sensors, and then publishes the result when the value changes or every 20min. There is also a alarm function when the value goes higher/lower than the alarm limits.
MQTT Interface
Data out
Temperature
Data syntax is "temperature=XX.XX" where "XX.XX" is the reading in deg C.
"FunTechHouse/Room1/Temperature" "temperature=22.3"Alarm high
When a high alarm is triggered we have "Alarm: High temperature=XX.XX level=YY.YY" where XX.XX is the reading that triggered that alarm, and YY.YY is the alarm level.
"FunTechHouse/Room1/Temperature" "Alarm: High temperature=26.9 level=25.0"Alarm low
When a low alarm is triggered we have "Alarm: Low temperature=XX.XX level=YY.YY" where XX.XX is the reading that triggered that alarm, and YY.YY is the alarm level.
"FunTechHouse/Room1/Temperature" "Alarm: Low temperature=21.9 level=22.0"Alarm sensor error
If there is a repeated read problem with the sensor, then there will be a sensor error.
"FunTechHouse/Room1/Temperature" "Alarm: Sensor error"Data in
This project does not subscribe to any data.
Hardware list
| Name | Link | Desc |
|---|---|---|
| Arduino Uno | arduino.cc - Arduino Uno | |
| Arduino Ethernet Shield | arduino.cc - Arduino Ethernet Shield | |
| LM35DZ | national.com - LM35 | Temperature sensor, 10mV/deg C |
| elfa.se - 73-090-57 | ||
| farnell.com - 1469236 | ||
| electrokit.com - 46971 | ||
| DS18B20 | maximintegrated.com - DS18B20 | Temperature sensor, OneWire |
| farnell.com - 2085184 | ||
| lawicel-shop.se - DS18B20 |
Schematics
LM35DZ example
How to connect a single LM35DZ onto pin A2.


DS18B20 example
How to connect a single DS18B20 onto pin 2.


Software list
| Name | Desc |
|---|---|
| github.com - FunTechHouse_RoomTemperature | The main Arduino program |
| arduino.cc - arduino-1.0.5 | The Arduino environment |
Software description
This project is using most of its logic from the FT building blocks, but this projects core is the array with sensors. To add more sensors into a project, just add and configure more sensor objects.
This example is using 2 temperature sensors, the first is a LM35 connected to A0, and the second is a DS18B20 connected to A1. Both will send a alarm if the temperature goes under 17 degC, or above 21 degC.
Filename: configure - FunTechHouse_RoomTemperature.ino
/**
 * Configure this project with device uniq sensor setup.
 */
void configure()
{
    //Config the first sensor
    sensor[0].init(A0, SENSOR_LVTS_LM35);
    sensor[0].setAlarmLevels(1.0, true, 17.0, true, 21.0);
    sensor[0].setValueDiff(1.4);
    sensor[0].setValueMaxCnt(30*60); //30*60s=>30min
    sensor[0].setTopic(
            "FunTechHouse/Room1/TemperatureData",
            "FunTechHouse/Room1/Temperature"
            );

    //And a second, that is a DS18B20
    sensor[1].init(A1, SENSOR_DS18B20);
    sensor[1].setAlarmLevels(1.0, true, 17.0, true, 21.0);
    sensor[1].setValueDiff(1.0);
    sensor[1].setValueMaxCnt(30*60); //30*60s=>30min
    sensor[1].setTopic(
            "FunTechHouse/Room2/TemperatureData",
            "FunTechHouse/Room2/Temperature"
            );
}
Then the main loop will loop the sensor array and ask each sensor object if there is any new temperature data, or any alarms. If there is data or alarms we will send those with the pubsubclient object called client.
Filename: loop - FunTechHouse_RoomTemperature.ino
/**
 * The main loop, runs all the time, over and over again.
 */
void loop()
{
    //Talk with the server so he dont forget us.
    if(client.loop() == false)
    {
        client.connect(project_name);
    }

    char str[OUT_STR_MAX];

    for( int i=0 ; i<SENSOR_CNT; i++ )
    {

        if( sensor[i].getTemperatureString(str, OUT_STR_MAX) )
        {
            if(client.connected())
            {
                client.publish(sensor[i].getTopicPublish(), str);
            }
        }

        //Now loop, send and Ack if there is any alarms
        int maxCnt = 20;
        SensorAlarmNumber num;
        do
        {
            num = sensor[i].alarmCheckString(str, OUT_STR_MAX);
            if(num != SENSOR_ALARM_NO)
            {
                if( client.connected() )
                {
                    if( client.publish(sensor[i].getTopicPublish(), str) )
                    {
                        sensor[i].alarmAck(num);
                    }
                }
            }

            maxCnt--;
        }
        while( num != SENSOR_ALARM_NO && maxCnt != 0);
    }


    digitalWrite(led, HIGH);
    delay(500);
    digitalWrite(led, LOW);
    delay(500);
}
The entire ino file looks like this, and please note that there is some project uniq data at the top that needs to be updated. The project_name and mac must be uniq, and if you cant active two projects on the same network if this is not updated. Then this project is using dhcp to get its ip number, and the MQTT server is called mosqhub. Also if you add more sensors, dont forget to increase the SENSOR_CNT so the actual sensor array also grows.
Filename: FunTechHouse_RoomTemperature.ino
/**
 * @file FunTechHouse_RoomTemperature.ino
 * @author Johan Simonsson
 * @brief Main file
 *
 * @mainpage The FunTechHouse RoomTemperature
 *
 * Room temperature sensor for the FunTechHouse project.
 * This project uses a Arduino with a Ethernet shield,
 * and sends its results using MQTT to a Mosquitto server.
 *
 * @see http://fun-tech.se/FunTechHouse/RoomTemperature/
 * @see https://github.com/jsiei97/FunTechHouse_RoomTemperature
 */

/*
 * Copyright (C) 2013 Johan Simonsson
 *
 * This program is free software: you can redistribute it and/or modify
 * it under the terms of the GNU General Public License as published by
 * the Free Software Foundation, either version 3 of the License, or
 * (at your option) any later version.
 *
 * This program is distributed in the hope that it will be useful,
 * but WITHOUT ANY WARRANTY; without even the implied warranty of
 * MERCHANTABILITY or FITNESS FOR A PARTICULAR PURPOSE.  See the
 * GNU General Public License for more details.
 *
 * You should have received a copy of the GNU General Public License
 * along with this program.  If not, see <http://www.gnu.org/licenses/>.
 */

#include <SPI.h>
#include <Ethernet.h>
#include "PubSubClient.h"
#include "Sensor.h"
#include "TemperatureSensor.h"
#include "SensorTypes.h"


/// This device MAC adress, it is written on the Shield and must be uniq.
uint8_t mac[]    = { 0x90, 0xA2, 0xDA, 0x0D, 0x51, 0xB3 };

/// The MQTT device name, this must be unique
char project_name[] = "FunTechHouse_RoomTemperature";

/// How many sensors shall the sensor array contain.
#define SENSOR_CNT 2
/// The sensor array with active sensors
Sensor sensor[SENSOR_CNT];

/// The MQTT client
PubSubClient client("mosqhub", 1883, callback);

/// Max size for the out string used in the main loop
#define OUT_STR_MAX 100

/// Life blink led is connected to IO pin.
int led = 2;


/**
 * The MQTT subscribe callback function.
 *
 * @param[in] topic What mqtt topic triggered this callback
 * @param[in] payload The actual message
 * @param[in] length The message size
 */
void callback(char* topic, uint8_t* payload, unsigned int length)
{
}

/**
 * Configure this project with device uniq sensor setup.
 */
void configure()
{
    //Config the first sensor
    sensor[0].init(A0, SENSOR_LVTS_LM35);
    sensor[0].setAlarmLevels(1.0, true, 17.0, true, 21.0);
    sensor[0].setValueDiff(1.4);
    sensor[0].setValueMaxCnt(30*60); //30*60s=>30min
    sensor[0].setTopic(
            "FunTechHouse/Room1/TemperatureData",
            "FunTechHouse/Room1/Temperature"
            );

    //And a second, that is a DS18B20
    sensor[1].init(A1, SENSOR_DS18B20);
    sensor[1].setAlarmLevels(1.0, true, 17.0, true, 21.0);
    sensor[1].setValueDiff(1.0);
    sensor[1].setValueMaxCnt(30*60); //30*60s=>30min
    sensor[1].setTopic(
            "FunTechHouse/Room2/TemperatureData",
            "FunTechHouse/Room2/Temperature"
            );
}

/**
 * First setup, runs once
 */
void setup()
{
    //INTERNAL: an built-in reference, equal to 1.1 volts on the ATmega168 or ATmega328
    analogReference(INTERNAL); //1.1V

    pinMode(led, OUTPUT);

    //Configure this project.
    configure();

    //Start ethernet, if no ip is given then dhcp is used.
    Ethernet.begin(mac);

    //Loop the sensors and tell mqtt server that we are alive.
    if (client.connect(project_name))
    {
        for( int i=0 ; i<SENSOR_CNT; i++ )
        {
            client.publish( sensor[i].getTopicPublish(), "#Hello world" );
            client.subscribe( sensor[i].getTopicSubscribe() );
        }
    }
}

/**
 * The main loop, runs all the time, over and over again.
 */
void loop()
{
    //Talk with the server so he dont forget us.
    if(client.loop() == false)
    {
        client.connect(project_name);
    }

    char str[OUT_STR_MAX];

    for( int i=0 ; i<SENSOR_CNT; i++ )
    {

        if( sensor[i].getTemperatureString(str, OUT_STR_MAX) )
        {
            if(client.connected())
            {
                client.publish(sensor[i].getTopicPublish(), str);
            }
        }

        //Now loop, send and Ack if there is any alarms
        int maxCnt = 20;
        SensorAlarmNumber num;
        do
        {
            num = sensor[i].alarmCheckString(str, OUT_STR_MAX);
            if(num != SENSOR_ALARM_NO)
            {
                if( client.connected() )
                {
                    if( client.publish(sensor[i].getTopicPublish(), str) )
                    {
                        sensor[i].alarmAck(num);
                    }
                }
            }

            maxCnt--;
        }
        while( num != SENSOR_ALARM_NO && maxCnt != 0);
    }


    digitalWrite(led, HIGH);
    delay(500);
    digitalWrite(led, LOW);
    delay(500);
}
For a more info about the code, I have generated a doxygen pdf that has the more info about the code, doxygen.FunTechHouse_RoomTemperature.pdf. Or download the project from github, https://github.com/jsiei97/FunTechHouse_RoomTemperature.
Build example one
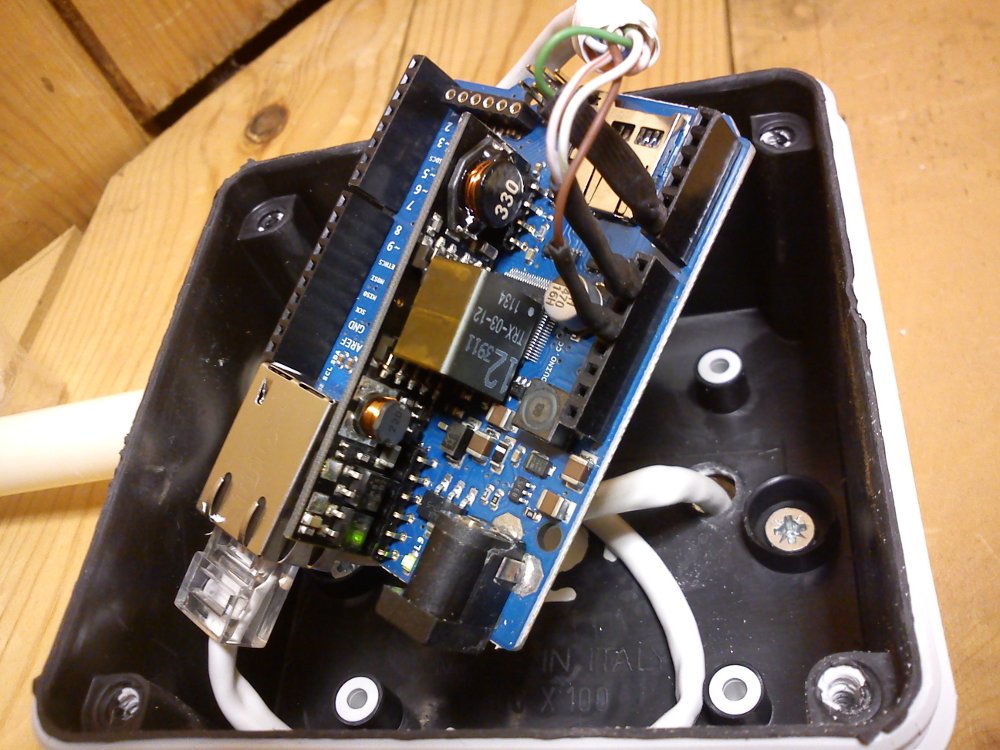
In this example I use a Arduino Ethernet board with the PoE module, and a DS18B20 sensor. I placed the Arduino in a basic box in a closet on one side of the wall, and mounted the DS18B20 on the other side of that wall in a nice looking room sensor box. This approach means that all no cables are visible (unless you look inside the closet).
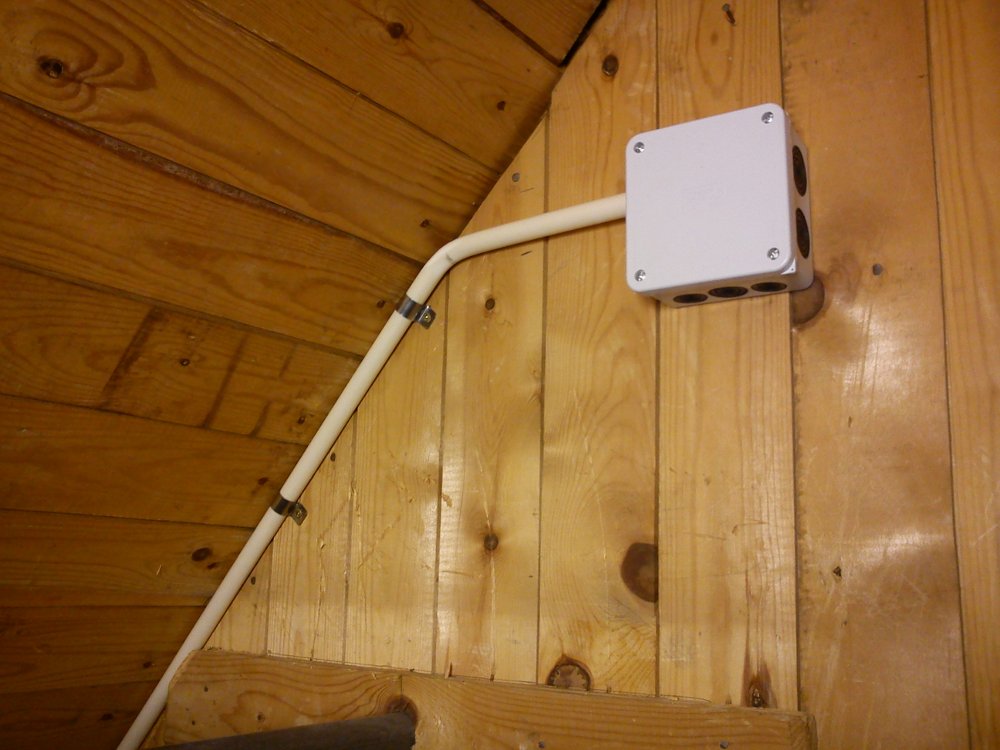
Since we power the Arduino with PoE, we can simplify the installation and use the ethernet cable for both data and power. And since the sensor is placed on the other side of this wall, the hole through the wall is hidden behind the box it self.

Between the Arduino and the DS18B20 I just used the same cat5e cable as I used for the ethernet installation, but I soldered on a couple of pins from a header so the cable would fit right onto the Arduino, and covered with some heat shrink to add some isolation.
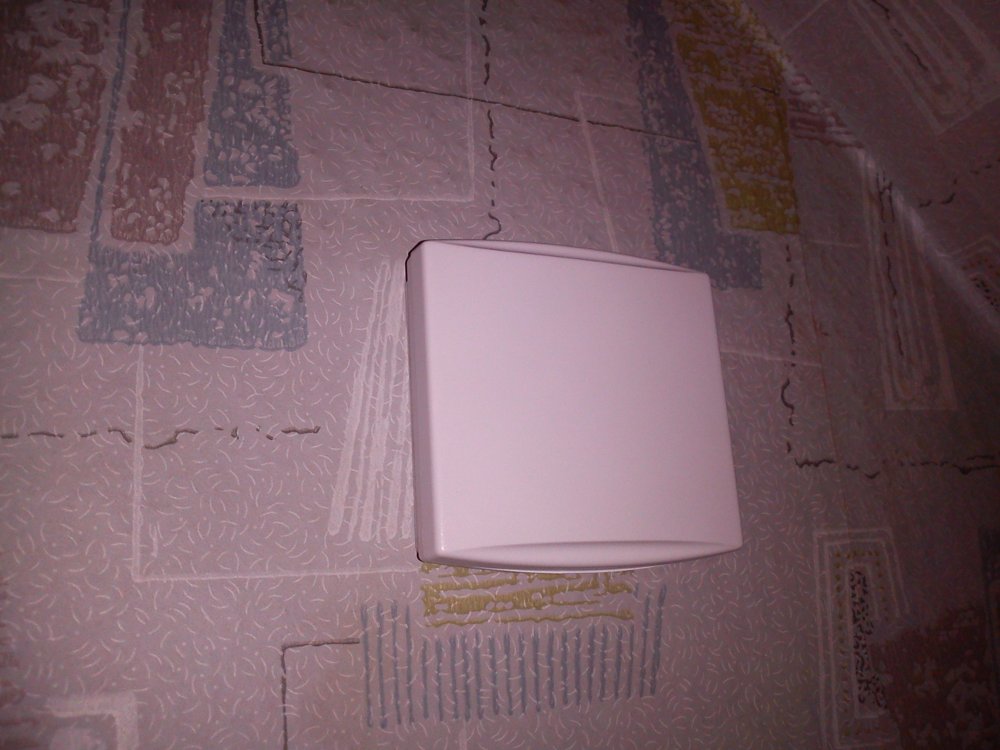
So in the room this white box is all that is visible.
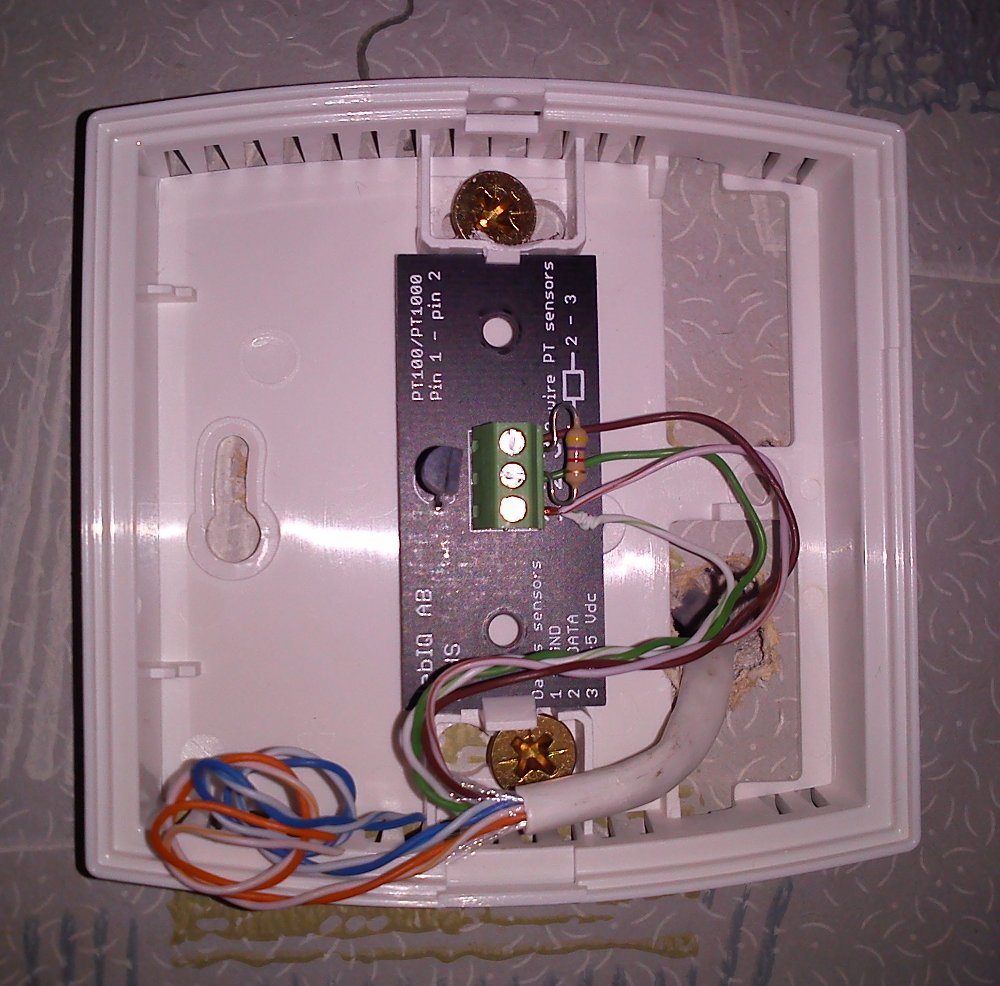
And inside this box had a basic screw connector, that there is where I place the mandatory pull-up resistor for the OneWire bus
Bill of materials
| Name | Link | Price |
|---|---|---|
| Arduino Uno Ethernet PoE R3 | lawicel: ARD-UNO-ETHPOE-3 | 589,00 sek |
| Dallas 1-wire PRO rumsgivare | energibutiken.se | 189,00 sek |
| Kopplingsdosa, 100 x 100 x 55 mm | Biltema: 350010 | 49,90 sek |
| Total price | 830 sek ~ 96€ |
